hlo world

Share:

More Posts

Simple Tricks to Clear Hair from Bathroom Drains

Simple Tricks to Clear Hair from Bathroom Drains

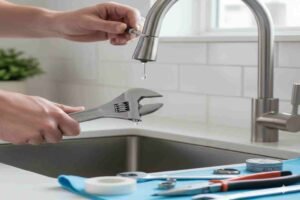
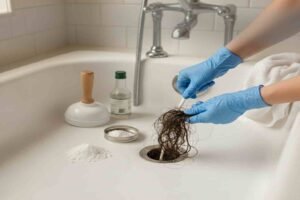
Have you ever taken a shower only to discover that water is accumulating around your feet, just like a tiny lake you didn’t want? Or maybe you have seen that draining sink of yours being so slow and struggling as if it were trying to get the water through a narrow straw? If your answer is yes, then you have already encountered the most common bathroom headache, clogging of drains caused by hair. It invades without a sound, is so strong in sticking, and in the end, turns your once smooth and quick shower experience into a frustratingly slow and Messy draining situation.  To the silver lining, it is not as hard to dispose of this hair in your drains as it sounds. Simple is the blockage that can be eliminated using simple techniques and intelligent prevention habits, and hence the rest of the blockage can be removed, and the bathroom drains are relieved of the stress it produces. We have entered into the most successful solutions! 1. Start with Manual Removal or Drain Snake Manual removal is one of the fastest ways to unclog hair. Put on disposable gloves, remove the drain cover and make an attempt to pull out any hair that is visible. If the hair mass is somewhat deeper, then the use of a drain snake is allowed, as suggested by professional plumbers. A drain snake is a handy piece of plastic equipment that has little barbs which attach to the hair and tug it out easily. Such appliances are cheap, convenient, and surprisingly effective, especially on recently acquired clogs that have not yet been hardened with soap scum. 2. Use Hot Water to Soften the Build-Up In case the blockage is not very serious, then pouring the drain with hot water will probably bring about a noticeable difference. Hot water will melt the soap residue, and the conditioner buildup, and the oils that cling to hair will go down. All one has to do is to simply bring the water up to a temperature that is hot (not boiling) and allow it to drain slowly down the drain in bits. This loosening will frequently reduce the clog to a small size where water can flow more easily or the drain ready to the next cleaning procedure. 3. Try Classic Bicarbonate of Soda Vinegar Reaction There is a reason behind the use of baking soda and vinegar as a household remedy. Add a cup of vinegar and pour a cup of baking soda into the drain. The mixture will fizz and simultaneously it will be washing down the residue and loosening the hair that is firmly embedded within the pipes. You may then soak in hot water after 10 to 15 minutes. This is not a rough procedure to pipes and is an excellent natural substitute of rough chemical cleaners. 4. Employ a Wet/Dry Vacuum for Deep Clogs A wet/dry vacuum could actually be your best partner at home to break through hair clogs in no time. It is switched to liquid mode, and the nozzle is put over the drain in a very tight position. If the edges are sealed with a towel, then this will result in better suction. The vacuum is turned on, and it will suck out hair, soap scum, and anything else that was caught inside. For more details on how plumbing systems work, you can check this resource. It may not seem very clean, but still, it’s the one and only home method for deep blockages that are very powerful. 5. Do the Plunge for Tough Blockages A plunger is a tool used not only for toilets, but it does wonders for sinks and bathtubs as well. The first thing to do is fill the sink or tub with water enough to be at the level of the plunger cup, then place the plunger over the drain and plunge with lots of force. The plunging action incidentally aids in pushing the hair that has been trapped in the pipe. Once the blockage is loosened, it is best to run water down the drain so as to clear the passageway easily. 6. Resort to Chemical Cleaners Only at Last Chemicals used to unblock drains will eat through hair and hard buildup, but they are to be used as a last resort. Their frequent use can result in pipe damage and plumbing issues that will last for a long time. In case none of the alternatives were effective then select a product that is specifically designed to remove hair clogs and proceed with the instructions. One is also recommended to make sure the room is well ventilated and wear gloves as a precaution. This technique is potent but should only be considered if the others fail. 7. Hair Clogs Not Allowed Back Prevention of hair in drains is the best way to counteract whatever formed them. The use of drain catchers is the simplest way; it captures hairs before they go into the pipes. Another weekly routine to keep the drain cover clean also hampers the accumulation of debris. The other clever thing to do is to have hair brushed before taking a shower because this will lessen the hair that will be deposited in the process of taking a shower. Lastly, emptying the drain out with hot water once in a week will also help avoid the occurrence of drains that are clogged due to cold water. Conclusion Hair clogs are actually a hassle, yet it is easy to get rid of them with the application of the right approach as per expert staff. Whether you decide to either do it by hand, use organic cleaners or a vacuum trick, you will always be able to find a way to reinstate the normal running of your drain. Just a bit of preventive maintenance can make a huge difference in the cleanliness of your pipes and in making your bathroom free of stress.

The Best Hacks to Repair a Leaky Faucet Easily

The Best Hacks to Repair a Leaky Faucet Easily?

Repair a leaky faucet easily with simple DIY hacks Do you hate dripping of the faucet? If yes, then you are at the right place. A leaky faucet at home is one of the most annoying things; it is so small, and yet so big that you cannot see it, but it is so huge that it is ruining your comfort. It may make you rise in the middle of the night, maybe you do feel a pang of conscience whenever you hear water dripping or maybe you are just fed up with the drip that just is that keeps reminding you that something is wrong. However, the broken leaky faucet is not as hard to repair as most individuals think. You need not be a plumber or possess any tools; you need not even get a full remodelling of a bathroom. Likewise, it is repairable and with little knowledge like expert plumbers and patience can save on your water bill, as well, because you can repair it yourself. 1. Knowing the Reason Why Faucets Leak It is always prudent to know the reasons why the faucets are leaking before visiting the toolbox. You can also read more about how a faucet works here. The leaks are the most frequent as they are caused by the internal components that are located inside the faucet i.e. washers, O-rings or cartridges being worn out as the days pass by. As people go through the faucet, these parts weaken slowly, loosen and even crack, leading to drops of water leaking out even when the tap is well closed.  A leaky faucet may also be caused by hard water deposits, water pressure and outdated hardware. With a sense of the reason behind it, the solution becomes far less terrifying. 2. Turning Off the Water Supply The first step towards every successful repair is a simple yet important step of turning off the water. Check under your sinks where the little pipes where the hot and cold water are operated are. Turn clockwise to turn off. This can be done to make sure that you do not have to contend with sudden sprays or floods during work. Then switch on the tap and flush out the remaining water in the pipe. This cleanses the pipes and leaves a dry and safe working area. 3. Breaking Down the Faucet When the water has been turned off, the faucet is now to be dismantled. You need not worry, this section is easier than it sounds. The screw that fits the handle is covered by a cap or some decoration on most faucets. Use a flat tool to gently lift the cap off, and then you have to remove the screw and lift off the handle. Indoors, there will be more screws and inner mechanisms depending on the type of faucet- compression, cartridge, ball, or ceramic-disk. Take your time, and see how all things go together, and put all the little bits together, so that nothing will get lost. 4. Malfunctioning Components Check-Up Check the rubber washers, identify older wear and tear, broken O-rings, or a broken cartridge. These are the suspects of the common irritant drip. In case of brittle, stiff or loose parts, they probably require replacement. In the case of the cartridge or ceramic-disk faucets, the whole cartridge might require replacement. This is all in finding out who the culprit is in order to know specifically what to replace. 5. Replacing the Faulty Parts Afterwards, there comes the gratifying aspect, which is the addition of new-fresh parts. Whether it is a spare part or a new part, it is cheap and readily accessible in hardware shops. In case you do not know what to purchase, you can just bring the old one along and match it. After the right parts are in hand, put them into their right positions just as the original ones were fitted. Hold all the parts firmly though not excessively; otherwise, injury will ensue. These new elements will seal the faucet effectively, hence avoiding leakage and is a clear flow of water. 6. How to Clean the Inside of the Faucet Remove the time to wash the internal parts of the faucet before putting it back. The hard water mineral deposits usually accumulate within it, interfering with movement and sealing. These deposits can be relaxed by adding white vinegar to the components, and the faucet will be functioning like new. Wipe all the stuff using a soft cloth in order to remove dirt or film. The inside of the faucet must be clean and this will assist in preventing future leakages and also performance. 7. Reassembling the Faucet Once everything has been washed changed the broken ones, you are now ready to begin building the faucet in the same order as it was brought down. Rebuild the cartridge, washers, screws and handle. Make sure that there are no floating bits. When the handle has been secured, replace the decorative cap. It is time now to begin to feel the faucet growing smooth and hard. 8. Checking the Faucet for Leaks When the water passes out in a smooth manner with no leakage when you use the handle, which is not hard, you have done the faucet well. With a drip, loosen up the parts and tighten them once more or check once more that the new component is in the right position. Most of the leaks are evaporated right after proper replacement, according to professional personnel. Conclusion It is not only fixing a leaky faucet to eliminate an irritating drip, but to find some form of comfort, save water, safeguard your home against possible destruction and a sense of DIY accomplishment. A little patienc,e and this easy step-by-step guide will enable you to cope with the job easily without invoking the services of a plumber. When you hear that irritating drip again, you will not have to put up with it or live with it, you will know what to

Effective Tips and Hacks to Stop Your Squeaky Shower

Effective Tips and Hacks to Stop Your Squeaky Shower

Have you ever thought why that annoying sound fills your bathroom as soon as you switch on the tap? A shower in the morning must be serene every day. Nonetheless, it may be an indicator of concealed issues. High pressure, deteriorated cartridges, loose washers, trapped air and decayed valve seats cause that irritating noise. It does not sound like much, but your screaming shower is talking to you. Simple steps can help you stop your squeaky shower effectively. Plumbing is a sensitive system, and strange sounds are an indicator of the behind the scenes problems. Be it high water pressure or the fact that the system requires replacement of certain parts. The majority of the issues will be resolved without the need to change your entire system. Here, one will find out the top reasons behind shower squeals, some troubleshooting, and clever, realistic means of regaining some tranquillity in the bathroom routine. These solutions will help you easily stop your squeaky shower and restore peace. 1. High Water Pressure Shocking water pressure does more than create a sound that is unpleasant, according to Expert Personnel. Vibrations make a piercing sound when the water passes through your pipes too fast. It may also destroy washers, valves, and fittings, reducing their life. To test, a simple water pressure gauge at a tap is used. High pressure is anything beyond 60 psi. A pressure reducing valve (PRV) reduces the flow to a safe amount, eliminates squeals. So, helps avoid permanent damage to your plumbing system so your daily bath unit can remain quiet and relaxing. This is one of the most effective ways to stop your squeaky shower. 2. Fix Worn Cartridge Your shower cartridge reminds the heart of your fixture, which controls the flow of hot and cold water. Gradually, it can be worn out through friction and mineral accumulation. A damaged cartridge allows water to pass through minute holes, creating a squeezy sound each time you switch on the water unit. The other indicators are uneven temperature or drips when turned off. One has to switch off the water, take off the handle, and replace it with another one.  This minor improvement returns the flow to a normal, removes squeals, and makes your bath fixture immediately better. The maintenance of your bath unit is regular and will make your shower run quietly and efficiently. Such regular care can help you stop your squeaky shower quickly. 3. Friction from Loose Washers These little washers in your faucet might not be a very big deal, but they can be a great source of noise when worn or loose. The irritating sound is because of vibrations produced by the water when it moves repeatedly over the washer, subsequently stirring the metal and the threads themselves.  The problem is usually solved by removing the handle, checking the washers, and replacing those damaged. In case of observation of mineral deposits, they can be cleaned quickly by the use of vinegar to avoid future damage. The correctly set up washers not only eliminate the squeal but also eliminate the water leakage and save water. Thus transforming your annoying bath unit into a relaxing, stress-free experience. This easy step will also help stop your squeaky shower permanently. 4. Air in Pipes The squealing is not always of broken components; they are of strangled air. Repairs made in plumbing or maintenance, or water mains, or repairs might leave air pockets in your pipes. These air pockets produce noise and vibrations when the water passes. To repair, turn on all faucets and run water for a few minutes. This purges the air out of the system, thus easy to move water. It can usually be completely removed using a free, simple fix, where you have peace and calm without calling in a plumber. It’s one of the simplest ways to stop your squeaky shower without tools. 5. Valve Seat Wear and Tear Valve seats are used to attach the cartridge to the faucet and form a water-tight seal. With time, wear, corrosion, or grooves may occur that will allow the water to leak out in the wrong way and cause noise. Some of the indicators are dripping taps and irregular flow. The first step is to remove the cartridge and check the valve seat. You are able to grind shallow grooves or change the seat in case of necessity. A valve seat that is in excellent shape gives good sealing, prevents squealing, and assists in the consumption of water 6. Vibrating or Loose Pipes In other cases, it is not the sprayhead but the pipes. Water travelling through loose pipes will vibrate and rattle. Check uncovered plumbing, tighten loose brackets, and cushion where it is needed. Pipe vibrations may increase in multi-story homes, and therefore, the noise may be even louder. Securing fasteners and minimising, movement of the pipes will help to get less squeal. It also increases the life of your plumbing, making your bathroom quiet and your pipes always in good condition. 7. Pipes That Are Too Narrow Pipes that are incorrectly sized may form areas of high pressure where the water travels at a high speed through narrow holes with sounds. Old houses might have very thin pipes that do not fit well with the new fixtures. Options such as the possibility to upgrade to the correct size of pipes or install flow regulators are available. Professional advice is advisable to make the right installation. Well-dimensioned pipes enable water to circulate freely and reduce vibrations and constant squealing.  Conclusion Even though a squeaky bathroom unit is a minor issue. It can still be a sign of more serious issues that could cost a lot of money if ignored. The reasons are usually high pressure of water, old cartridges, mineral deposition, and trapped making and loose pipes. It is usually solved by simple solutions such as cleaning, changing worn-out parts, or making some simple adjustments.

Send Us A Message

Reliable plumbing solutions with expert service and customer satisfaction guaranteed.

24*7

our service is available

Quick Links

About Us

© 2025 powered by Instant Plumber